Study Guide
Every chapter's key facts, the glossary, and the full sign reference on one page — print it or save it as a PDF for quick revision.
Choose what to include
Chapter key facts
Chapter 1 — The Public Road & Where Traffic Rules Apply
- A public road covers far more than paved streets — a bridge, tunnel, square, motorway, or even an unsurfaced track counts too, as long as the public can genuinely come and go there, with every vehicle type or only some, without needing a reason or anyone's permission.
- A public area, like a supermarket car park or a fuel station forecourt, is open only to visitors who actually have a reason to be there; land that isn't open to the public at all, such as a haulage yard or a driving school's enclosed circuit, stays private property, and any road signposted 'private property' is not a public road.
- Only on the public road does the highway code carry legal force, though certain serious matters — drink-driving, causing an injury in a crash, driving without a valid licence — can still be fined or prosecuted anywhere; trams are a rare exception to almost the entire highway code, but a tram driver still has to comply with an authorised person's directions and respect traffic lights.
- Belgium drives on the right: keep toward the right-hand side of the carriageway whenever reasonably possible; you may not cross into a separate carriageway on your left unless a police officer or a traffic sign says otherwise, and a continuous white line near the carriageway's edge only shows where it ends, without banning or requiring anything by itself.
- Default speed limits, unless a sign says otherwise: 50 km/h in a built-up area anywhere in Belgium; 70 km/h in Flanders and 90 km/h in Wallonia outside a built-up area; 30 km/h by default across the whole Brussels-Capital Region since 1 January 2021 ('Ville 30'); and 120 km/h on a motorway, or on an express road or ordinary road outside a built-up area with at least two lanes per direction separated by a central reservation.
- Excessive speeding can cost you your licence immediately: police withdraw it on the spot for 15 days if you're caught more than 20 km/h over the limit in a built-up area, zone 30, school zone, or residential zone, or more than 30 km/h over elsewhere; a judge can later also declare your right to drive lapsed if you exceed the limit by more than 40 km/h on a motorway, express road, or ordinary road, or by more than 30 km/h in a built-up area, zone 30, or residential zone.
- A speed hump carries a 30 km/h limit whenever the A14 and F87 signs apply to it, it sits at a junction, or it lies inside a zone 30; passing another vehicle on the left is otherwise banned on a speed hump, except that, since 1 April 2023, overtaking a cyclist there is allowed.
- A provisional (learner's) licence does not allow driving on the public road from 22:00 to 06:00 on Friday, Saturday, and Sunday nights, or on the night before and the evening of a public holiday; excessive speeding as a provisional licence holder can additionally lead a judge to require redoing the theoretical and practical exams before being allowed to drive again.
Chapter 2 — Traffic Signs: Categories & How to Read Them
- Belgium has hundreds of traffic signs, but they all belong to just seven shape-and-colour families: A (warning), B (priority), C (prohibitory), D (mandatory), E (parking/stopping), F (indication), and M (additional panels).
- At a B5 stop sign, a full stop is always compulsory before the stop line, even if the road looks completely empty; at a B1 give-way sign, you only need to actually stop if there is a road user you must yield to.
- A B1 or B5 sign only obliges you to give way to other drivers on the road you are entering — not to a pedestrian at the corner, who gets priority there only if a marked pedestrian crossing exists at that spot.
- B3 and B7 are advance-warning versions of B1 and B5: B3 tells you a give-way junction is coming up, B7 tells you a stop sign is coming up, each at the distance shown on the sign itself.
- Unlike B1 and B5, which apply only to the one junction where they stand, the B9 priority-road sign (yellow diamond) gives you ongoing priority over every side road until a sign cancels it.
- A prohibitory sign showing only a plain red circle with no symbol inside means no vehicles are allowed at all, in either direction.
- D7 makes the cycle track compulsory: cyclists and moped class A riders must use it instead of the carriageway.
- E1 and E3 look similar but differ: E1 forbids parking but still allows a brief stop (e.g. to drop someone off); E3 forbids stopping altogether, even for a moment.
Chapter 3 — Road Markings & Lanes
- Road markings carry the same legal weight as a traffic sign; when a marking and a sign seem to disagree, the more specific, more recent instruction wins — temporary orange markings around roadworks override permanent white ones.
- Crossing an oncoming vehicle means positioning as close to the right edge as the road genuinely allows, so the gap opens up on the oncoming driver's right; a too-narrow road allows a brief detour onto a levelled verge, but never onto a solid-white-edge strip or a cycle track.
- A broken white line down the middle of the road clears you to cross it and overtake a vehicle ahead going slower than the speed limit, unless a sign says otherwise; once it's continuous, crossing to overtake is off the table no matter how slow traffic ahead is dragging.
- When a broken and a continuous line run side by side, whether you may cross depends on which one is on your side: cross only if it's the broken line, and cross back over the continuous line once you've cleared the other vehicle.
- Arrows stencilled onto a lane near a junction aren't decoration — they're binding road markings that spell out exactly where that lane will take you.
- A traffic displacement area (tightly spaced diagonal white hatching forming a triangle or wedge) functions as unusable ground — no driving across it, waiting on it, or parking in it.
- Zip merging kicks in whenever a lane closure slows traffic: hold your own lane until the tarmac genuinely runs out, then slot in one car at a time with the continuing lane; if both sides pinch shut together, the right-hand vehicle yields first, the left-hand one after.
- A bus lane (F17) belongs to scheduled public transport — cars may not drive or park in it, with only narrow exceptions to cross it briefly near a junction, around an obstacle, or to reach a driveway, parking area, or property; an F18 tram/bus track goes further still, sitting entirely outside the carriageway, so it may only be crossed briefly at a marked point and never driven along.
Chapter 4 — Priority & Right of Way
- Unless a sign, traffic light, or road marking says otherwise, you must give way to traffic approaching from your right at any junction — the rule is about direction, not the size of the road.
- Leaving a driveway, an unpaved track, or a car park onto a public road always means giving way to everyone on that road, no matter which direction they come from.
- Trams always have priority at every junction, in every configuration — even on a priority road and even when approaching from your left. Roundabouts flip the usual logic too: whoever is already looping the ring gets to go, and anyone joining has to slot in behind them.
- A B9 sign marks a priority road: you keep priority over every side road at every junction, even from the right, until a B11 sign cancels it or you leave the road. A B15 sign is different — it grants priority only at the one junction immediately ahead.
- Where a road narrows to one usable lane, B19 means you must yield to oncoming traffic, while B21 means the opposite direction must yield to you.
- Lane changes, crossing the carriageway, parking-space entries and exits, leaving private property, U-turns, and reversing all fall under 'manoeuvre' — and none of them come with priority; you owe everyone else, pedestrians included, the right of way.
- When turning left or right at a junction, you must give way to oncoming vehicles going straight ahead or turning right, and to pedestrians or cyclists already using the road you're turning into. Between two oncoming drivers turning opposite ways, the shorter arc wins: the right-turner goes, the left-turner waits.
- A police car, ambulance, or fire engine only outranks the ordinary priority rules once its blue flashing light and siren are both running at the same time — the light by itself, siren silent, changes nothing.
Chapter 5 — Roundabouts & Intersections
- A circular junction is only legally a 'roundabout' in Belgium if it carries the D5 sign and every entrance has a B1 or B5 sign.
- On an official roundabout (D5 + B1/B5), traffic already circulating on the ring always has priority over traffic entering.
- If a circular junction has no D5 or B1 signs at all, it is legally not a roundabout, and priority to the right applies instead — the exact opposite of an official roundabout.
- As a general guide, on a multi-lane roundabout use the outer (right) lane for the first exits and the inner (left) lane if going further around — but keep checking your mirrors, since lanes can shift.
- Indicating on a roundabout: no signal needed on entry unless taking the very first exit (then signal right); signal whenever changing lanes on the ring; and signal right as you pass the exit just before the one you want, to show you're about to leave.
- Leaving a roundabout means giving way to cyclists staying on the ring's cycle track and to crossing pedestrians — except at a set-back cyclist crossing with its own give-way sign facing the cyclists, where priority isn't automatically theirs unless they've already entered the roadway.
- Away from roundabouts, most junctions are one of three basic shapes (such as a T-junction or a crossroads), and the usual priority rules — priority to the right, priority signs, priority roads — apply the same way regardless of the shape.
- Priority and a green light don't guarantee room on the far side of a junction — read the traffic yourself, and if it looks like you'd stall mid-crossing, hold back before the junction until a real gap opens rather than blocking cross traffic.
Chapter 6 — Traffic Lights & Signals from Authorized Persons
- Think in tiers when instructions clash: a human directing traffic settles it outright, a working light or priority sign settles it next, and only in the absence of both do the general priority rules (priority to the right, priority roads, and so on) decide.
- Red is absolute — a complete stop before the line, no room for judgment calls; identify which red light is yours by its position at your right, not one showing only on your left.
- Green means you may go, but you must still give way to vehicles or pedestrians still clearing the junction, and to any priority still owed under other rules.
- Treat solid orange as a stop order too, with a single carve-out: braking in time has to genuinely be unsafe before easing through becomes the better call.
- A flashing orange light is working exactly as designed, not broken — it asks for alertness rather than a stop, with priority decided the same way it would be if the light weren't there at all.
- If the only green shown is an arrow, with no round green light, you may only move in that specific direction — even if another direction would otherwise be allowed from that lane.
- Learn the four hand signals an authorized person uses, since they beat every light and sign: upright arm(s) means stop for whoever faces them; arms out to the sides splits traffic into a stopped group (front and back) and a moving group (level with the arms); an up-down bob means ease off; a circling arm means pick up speed.
- A priority sign fixed beneath a traffic light stays dormant while that light is genuinely working for your lane; it only takes over once the light is off, stuck flashing, or simply not addressed to your lane at all.
Chapter 7 — Speed, Following Distance & Overtaking
- The posted speed limit is a legal ceiling, not a target — you must always be able to stop within the distance you can see to be clear ahead, and slow down further for rain, fog, ice, snow, a poor road surface, heavy traffic, poor lighting, or blocked visibility.
- Follow the two-second following distance rule — roughly 25 m at 50 km/h, 35 m at 70 km/h, 45 m at 90 km/h, and 65 m at 120 km/h — and double that gap to three or four seconds in rain, fog, or on a slippery road.
- Stopping distance is a sum of two pieces stacked together — the thinking gap before your foot even reaches the pedal (around 15 m at 50 km/h, 27 m at 90 km/h, 36 m at 120 km/h) and the braking itself; anything that dulls reflexes, from alcohol and drugs to exhaustion and a distracted mind, stretches that first piece even longer.
- Four dry-road stopping-distance figures carry real exam weight: roughly 30 m at 50 km/h, 45 m at 70 km/h, 70 m at 90 km/h, 95 m at 110 km/h — and they let you bracket any speed asked about that falls between them.
- What ABS delivers is steering control during hard braking, not automatically a shorter braking distance — and a wet or loose/gravelly surface still eats up more room to stop regardless. Push the pedal hard and hold it (no pumping) if ABS kicks in, and keep tyre tread above 1.6 mm, remembering that's the legal floor, not a safe cushion.
- Whether a manoeuvre counts as "overtaking" hinges on the vehicle ahead actually moving — steer around one sitting still and you're merely passing, a different category entirely. Before pulling out to overtake: mirrors and blind spot genuinely checked, intention signalled, the road ahead clear enough to finish the move without forcing oncoming traffic to react, the speed limit respected throughout, and nobody already overtaking you from behind.
- Five settings shut overtaking down completely: a vehicle ahead nearing, slowing at, or stopped by a pedestrian or cyclist crossing; on or near a level crossing without barriers or a white proceed light; a junction where you're the one owing priority (priority road or B15 status excepted); and any bend or hilltop hiding what's ahead — unless the road is laned and you can finish without crossing the solid centre line. None of these five bans touch cyclists, so passing one on the left stays fine throughout.
- Left stays the default overtaking side; right-side overtaking opens up only in three specific windows — crawling queued traffic, a driver ahead who's signalled and drifted left to turn, or a moving tram whose right-hand gap is blocked. On a single lane per direction, don't chain overtakes: tuck back right after clearing one vehicle before eyeing a second, unless the road runs four-plus lanes or is one-way.
Chapter 8 — Pedestrians, Cyclists & Other Vulnerable Road Users
- At a marked pedestrian crossing without traffic lights or police, you must give way to any pedestrian already on it or clearly about to step onto it — even when turning at a junction with a green light.
- You may never park or stand within 5 metres in front of a pedestrian crossing or a junction.
- Whenever a marked crossing is within 20 metres, pedestrians are required to walk to it rather than crossing where they stand; only when nothing is close by may they cross elsewhere, and there they must yield to road traffic.
- When overtaking a cyclist, speed pedelec, or moped rider — or passing a pedestrian walking on the carriageway — you must leave a minimum lateral distance of 1 metre in a built-up area and 1.5 metres outside one; if there is not enough room, you must not overtake.
- A cycle track sits outside the carriageway entirely, so a car has no business driving, waiting, or parking on it; a coloured lane lacking the parallel broken lines or an official sign is merely a 'suggestion lane', where cars remain free to drive, wait, and park.
- At the point a cycle track ends and its riders rejoin the carriageway, priority belongs to them over drivers; waiting or parking is forbidden within 5 metres on either side of that merge point.
- Cyclists may ride two abreast on a cycle track or on the carriageway, but outside a built-up area they must move into single file as soon as a vehicle approaches from behind.
- The B22 and B23 signs let cyclists pass a red or orange light — B22 to turn right, B23 to go straight ahead — but neither sign gives them priority over other traffic or pedestrians.
Chapter 9 — Public Transport, Trams & Level Crossings
- A tram always takes priority regardless of the direction it comes from, left included, and only three things can override that: a working traffic light, an authorized person actively directing traffic, or a posted priority sign.
- Where a stop has no safety island, you must stop completely and only continue at moderate speed once everyone has safely reached the pavement or the vehicle.
- Whenever you pass a moving tram, always do so on its right; you may only pass on the left if the right-hand passage is too narrow or blocked, and only if it does not endanger or hinder oncoming traffic.
- A driver caught behind a bus that's signaling to leave a built-up-area stop has to ease off and let it back into the traffic flow; the bus itself owes that driver nothing in return.
- Where a level crossing has no barriers or lights, or they are not working, you may only cross once you are certain no train is approaching.
- You must not enter a level crossing while the barriers are moving down or closed, or while the red lights are flashing or the audible warning is sounding — this applies to everyone, including pedestrians, not just vehicles.
- Pushing through flashing red lights or a barrier that's already coming down is grounds on its own for an immediate licence withdrawal — it's treated as a serious offense, full stop.
- Even when the traffic light ahead is green, you must not enter a junction or a level crossing if congestion means you would likely have to stop in the middle of it, blocking cross traffic, a tram, or a bus lane.
Chapter 10 — Stopping & Parking
- Your vehicle only counts as stopped if it stays immobile no longer than someone genuinely needs to get in or out, or for goods to be loaded or unloaded — past that point it becomes parking, whether or not you remain behind the wheel.
- Refuelling or charging an electric or hybrid vehicle is always classed as parking, not stopping, no matter how quickly you plan to be done.
- Both stopping and parking are shut out within 5 metres of a crossing used by pedestrians or cyclists, of where a cycle track starts or ends, or of a junction — and within 20 metres ahead of traffic lights, except for a vehicle no taller than 1.65 m where the light itself hangs at least 2 m above the road.
- Brief stopping being allowed doesn't mean parking is too: it's still off-limits within 15 metres of a bus, trolleybus, or tram stop sign, blocking a private driveway or garage entrance, closer than 1 metre to another stopped or parked vehicle, and in a disabled bay without the badge to match.
- Pairing E5 with E7 produces alternating parking on streets too narrow to host cars on both sides at once: E5 shuts its side for the month's first half, E7 takes the same side for the second half, so you always park across from whichever sign is active. Cars must cross to the opposite side on changeover day, between 19:30 and 20:00.
- Keep a stopped or parked vehicle parallel to the kerb, on the right in whichever direction you're travelling, tucked close to the edge of the carriageway, and in a single row — never sitting out from the kerb in a second row. If a usable verge runs alongside, park there instead of on the carriageway.
- A blue zone requires drivers of cars and similar vehicles to display a parking disc set to their arrival time, rounded forward to the next half hour. The default schedule, unless overridden by a local sign, is Monday through Saturday, 09:00 to 18:00, capped at a 2-hour stay; motorcycles and mopeds are exempt.
- A defective vehicle's time on a public road tops out at 24 hours, and a vehicle there purely to advertise gets just 3. Using the road to sell a vehicle outright isn't permitted under any circumstance.
Chapter 11 — Motorways & Special Roads
- Motorway speed tops out at 120 km/h with a 70 km/h floor in the right lane, waived only by a sign or by traffic/weather/roadworks that make it genuinely impossible; anything over 3.5 tonnes plus most buses face a 90 km/h ceiling, and that same 90 km/h ceiling binds provisional licence holders no matter what limit is posted.
- Pedestrians, cyclists, moped riders of any class, horse riders and anyone leading an animal, agricultural vehicles, and any vehicle that cannot sustain at least 70 km/h are all banned from a motorway.
- The law treats merging via an acceleration lane as an ordinary lane change, so it's on the merging driver to yield to traffic already flowing on the carriageway; but if that same access lane has been backed up solid by slow traffic, the roles flip and drivers on the carriageway must feed vehicles in one at a time, alternating, right where the lane runs out (zip merging).
- When leaving a motorway, signal and slow down inside the deceleration lane rather than on the main carriageway, where a sudden drop in speed would endanger traffic behind you, and only leave at a marked exit.
- As on any road, overtaking is done on the left; undertaking on the right remains forbidden except briefly on an acceleration lane or in slow-moving congestion, and the hard shoulder is never a driving lane — it is reserved for breakdowns, genuine emergencies, and vehicles directed there by the police.
- As soon as a road with two or more unbroken lanes running your way starts backing up — a rule that isn't limited to motorways — drivers owe emergency crews a corridor before the queue locks up entirely: that gap sits between left and right on two lanes, but shifts to between left and centre once a third lane joins the mix.
- A breakdown means: hazards on immediately, hard shoulder if the car will still move, the reflective vest goes on before any door opens, and the warning triangle lands roughly 100 metres back — far enough that a driver still catches sight of it from 50 metres out. Then it's a call to 112. Towing itself gets stricter on these roads too: only a police-summoned service may hook you up on a motorway, and a rope, strap, or emergency clutch never gets used on either a motorway or an 'autoweg'.
- An 'autoweg', bookended by signs F9 and F11, is set aside for motor vehicles and turns away the same crowd a motorway does, yet at-grade junctions and traffic lights can still show up on it and its 70 km/h floor simply doesn't exist — whatever ordinary limit is posted governs instead, though stopping and parking stay just as off-limits as they would be on a full motorway.
Chapter 12 — Vehicle Lighting, Signaling & Visibility
- Lights are mandatory between dusk and dawn, and by day too the moment something — a downpour, thick fog, falling snow, a tunnel — cuts visibility to about 200 metres or less; motorcycle and moped riders must keep their dipped beam on non-stop, day and night, while car drivers only need to make it a habit, not a legal one.
- Dip your beam near a train or a vessel, on a road so well lit you can already see about 100 metres ahead, within roughly 50 metres of a vehicle you're following (except mid-overtake), and immediately whenever an oncoming road user flashes at you; outside those triggers, the rule is simply never to dazzle anyone.
- A rear fog light is justified by fog or snow only once visibility has genuinely dropped to around 100 metres or less, but heavy rain justifies it regardless of how far you can see; switch it off the moment conditions improve.
- Hazard lights may be switched on while still moving only to flag a genuine hazard such as a sudden stopped-traffic queue or a nearby crash; they're also required once stopped somewhere risky, broken down, or towing — never simply to soften an illegal stop or parking spot.
- A vehicle must have fully working lights at all times as a standing legal duty, not just something checked at a roadworthiness inspection; reversing lights may only illuminate while reverse gear is actually engaged.
- Night driving requires white or yellowish dipped headlights at the front, red rear lights with brighter brake lights, a white light illuminating the rear registration plate, and red rear reflectors.
- When towing, both vehicles should run their hazard lights; a rigid tow bar usually needs no extra lighting as long as the towed vehicle's own lights work, but towing with a flexible rope or strap requires a supplementary rear light bar on the towed vehicle.
- Stop or park on the road or its verge between dusk and dawn, or whenever visibility sinks to about 200 metres or worse, and front sidelights plus a rear red light become mandatory — within a built-up area these can give way to a single parking light facing traffic, but only if the car sits lengthways and isn't coupled to a trailer.
Chapter 13 — Driving Licence, Documents, Insurance & Technical Requirements
- A category B licence (provisional or full) covers vehicles up to 3.5 tonnes maximum authorised mass (MAM/MTM); a minibus only qualifies if it seats at most 8 passengers besides the driver (9 total) — more requires category D.
- Two provisional licence paths exist: the 36-month model (from age 17, with a registered accompanying driver) and the 18-month model (from age 18, no accompanying driver but at least 20 hours of driving-school lessons plus a competency certificate); you may switch once, and a visible 'L' sign must be shown at the rear throughout.
- An accompanying driver must have held a category B licence for at least 8 years, must not have been disqualified from driving in the last 3 years, and must be registered on the licence itself (up to two allowed).
- During the provisional period the alcohol limit is the same 0.5 g/l as any other driver but penalties are harsher (minimum 8-day driving ban plus re-sitting both exams); night driving is also banned 22:00-06:00 on Fri/Sat/Sun and around public holidays, trailers and commercial goods transport are forbidden, and motorway speed is capped at 90 km/h.
- You must produce originals of your licence, registration certificate, proof of insurance (a white certificate since 2022), roadworthiness certificate when required, and ID card — only the insurance proof may be a self-printed copy.
- Compulsory third-party liability insurance covers injury or damage you cause to others only, not your own vehicle; a car's first roadworthiness inspection is due at 4 years old, then traditionally annual (a newer rule allows a 2-year interval for younger, lower-mileage cars).
- The Maximum Authorised Weight (M.A.W./MAM/MTM) is a fixed ceiling set once by the manufacturer, never changing over the vehicle's life; the Maximum Gross Weight (M.G.W.) is a live reading of what the vehicle actually weighs right now and must always stay at or under the M.A.W. Weight-based sub-plates on signs (e.g. '> 3.5 t') only bind vehicles above that specific threshold.
- Driving without a valid licence, insurance, or roadworthiness certificate is a serious offence tried before the police court (possible driving ban or imprisonment); a full category B licence allows towing a trailer up to 750 kg freely, or heavier if the combined car+trailer M.A.W. stays under 3.5 tonnes — provisional licence holders may not tow at all.
Chapter 14 — Alcohol, Drugs, Fitness to Drive & Road Safety
- The general blood alcohol limit is 0.5 g/l, with a stricter 0.2 g/l for professional drivers (bus, coach, truck, and paid-passenger-transport licence holders); provisional and novice drivers stay at 0.5 g/l but face harsher penalties. Repeat offenders or very high readings can also lead to a mandatory alcohol interlock that stops the car starting if it detects alcohol.
- Police may stop and breath-test any driver at any time — no suspicion of drinking is required. You may ask to wait 15 minutes before blowing, and refusing the test without a valid medical reason is itself an offence, treated exactly like testing positive at the highest tier.
- The roadside breath test is nothing more than a screening pass, returning a single letter — 'S' (safe), 'A' (alarm), or 'P' (positive) — that can't stand alone as legal evidence. Getting an 'A' or 'P' means a more precise breath analysis has to confirm it, and turning down the roadside test itself, absent a valid medical reason, is logged the same as a 'P' and brings an immediate 6-hour driving ban.
- Illegal drugs get zero tolerance under Belgian law: it's the presence of any detectable trace that counts as the offence, not whether it's actually affecting your driving. A saliva swab handles the roadside check, with a lab blood test confirming a positive reading afterward — and testing positive means your licence is handed over on the spot for a 12-hour driving ban.
- Holding a phone to call, text, or browse while driving is forbidden — and this still applies when you're stopped in traffic or at a red light, since sitting in traffic is not the same as being parked. A hands-free system is legally allowed, though it still divides your attention.
- A seatbelt is compulsory in every seat that has one, front or rear. Any child under 135 cm tall, regardless of age, needs an approved child restraint system suited to their size, and generally may not sit in the front seat unless a correctly fitted child seat is used there or there is no usable rear seat.
- Your very first move at any accident is to secure yourself and the scene — hazard lights, a warning triangle, engine off, a hi-vis vest before getting out — before you check on anyone injured or make any call.
- Driving away after causing or contributing to an accident, in order to avoid being identified, is a separate criminal offence — regardless of who was at fault — and applies even to minor damage, such as clipping a parked car or a road sign; penalties can include several years and a lengthy driving ban.
Chapter 15 — Eco-Driving & Environment
- A trip short enough to walk (up to about 1 km) or cycle (roughly 1 to 10 km) wastes fuel needlessly if you drive it instead — a cold engine chews through noticeably more fuel per kilometre than a warmed-up one, and starting cold again and again wears the engine down faster.
- For economical driving, change up before a petrol engine climbs past roughly 2500 rpm — around 2000 rpm for a diesel — giving yourself some leeway on a climb or with a heavy load.
- Blipping the throttle repeatedly while parked is never allowed — not even in winter to warm the engine up faster.
- Extra weight, an empty roof box or rack, a bike mounted on the roof, and open windows all push up fuel consumption by adding weight or fighting the airflow — a bike is better strapped to a carrier at the back of the car.
- Stick to the manufacturer-prescribed tyre pressure, checked cold; straying too far in either direction raises the risk of aquaplaning, and a badly worn tyre must be replaced — re-cutting it to extend its life is never permitted.
- Expecting to sit still for longer than roughly 30 seconds — held up at a level crossing, say — makes cutting the engine the more efficient move.
- Among common fuels, LPG and CNG generally come out as the cleanest, ahead of petrol; when diesel is the only option, the low-sulphur version pollutes less than the regular kind — and filling up with illegal red diesel (heavily-taxed heating/off-road fuel) in a car on public roads is heavily fined.
- A low emission zone (LEZ) — currently running in Antwerp, Ghent, and Brussels — turns away vehicles that fall short of the required EURO emission standard shown on the registration certificate; a higher EURO number and a higher ecoscore (0 to 100) both point to a cleaner, more environmentally friendly vehicle.
Chapter 16 — Vehicle Technology & Maintenance
- Tyre wear indicators moulded into the main grooves show when the tread has worn down to the legal minimum — that's the cue to replace the tyre, not a target to drive down to. Worn tread makes aquaplaning more likely.
- Radial and diagonal tyres can be mixed on a car, but never with a radial tyre at the front and a diagonal tyre at the rear — a radial front tyre requires radial tyres at the rear too.
- On a tyre marked 195/65 R15 91H: 195 is the width in mm, 65 is the height-to-width ratio, R means radial construction, 15 is the rim diameter in inches, 91 is the load index, and H is the speed index — the tyre's maximum rated speed.
- Studded tyres are only allowed between 1 November and 31 March, on vehicles up to 3.5 tonnes M.A.W., and are limited to 60 km/h on ordinary roads and 90 km/h on motorways (a lower local speed limit still applies). Snow chains aren't tied to a date — they may only be fitted when there's actually snow or ice on the road.
- In heavy rain, a film of water can build up between the tyres and the road faster than the tread can channel it away; the tyres then lose contact with the road entirely and the car becomes temporarily uncontrollable — worn tread and wrongly inflated tyres both make this more likely.
- Motor oil lubricates the engine's moving parts, prevents overheating and seizing, protects against rust, and cleans the engine as it circulates; brake fluid sits in its own separate reservoir, and running low compromises the brakes.
- Once the car is being driven, the alternator takes over from the battery: it supplies the car's electricity and recharges the battery at the same time.
- Whichever end of the car breaks loose, keep your eyes on your intended path rather than the danger. Front-wheel slip: stay off the brake. Rear-wheel slip: ease off the gas and push in the clutch, and don't brake there either.
Key Terms Glossary
Acceleration lane
Official exam terms: NL Invoegstrook · FR Bande d'accélération
Accident
Official exam terms: NL Ongeval · FR Accident
Blind spot
Official exam terms: NL Dode hoek · FR Angle mort
Blood alcohol limit
Official exam terms: NL Alcohollimiet · FR Limite d'alcoolémie
Brakes
Official exam terms: NL Remmen · FR Freins
Breathalyzer
Official exam terms: NL Ademtest · FR Alcootest
Broken white line
Official exam terms: NL Onderbroken witte streep · FR Ligne blanche discontinue
Built-up area
Official exam terms: NL Bebouwde kom · FR Agglomération
Bus lane
Official exam terms: NL Buslane · FR Bande bus
Carriageway (hardened surface for vehicles)
Official exam terms: NL Rijbaan · FR Chaussée
Central reservation
Official exam terms: NL Middenberm · FR Terre-plein central
Child restraint (child seat)
Official exam terms: NL Kinderzitje · FR Siège pour enfant
Continuous white line
Official exam terms: NL Doorgetrokken witte streep · FR Ligne blanche continue
Cycle lane
Official exam terms: NL Fietspad · FR Piste cyclable
Cyclist
Official exam terms: NL Fietser · FR Cycliste
Dipped beam
Official exam terms: NL Dimlicht · FR Feux de croisement
Driving licence
Official exam terms: NL Rijbewijs · FR Permis de conduire
Fine
Official exam terms: NL Boete · FR Amende
Full beam
Official exam terms: NL Grootlicht · FR Feux de route
Give way
Official exam terms: NL Voorrang verlenen · FR Céder le passage
Hard shoulder
Official exam terms: NL Pechstrook · FR Bande d'arrêt d'urgence
Hazard warning lights
Official exam terms: NL Alarmlichten · FR Feux de détresse
Indicator (turn signal)
Official exam terms: NL Richtingaanwijzer · FR Clignotant
Information sign
Official exam terms: NL Aanwijzingsbord · FR Panneau d'indication
Insurance
Official exam terms: NL Verzekering · FR Assurance
Junction
Official exam terms: NL Kruispunt · FR Carrefour
km/h
Official exam terms: NL km/u · FR km/h
Lane
Official exam terms: NL Rijstrook · FR Voie de circulation
Level crossing
Official exam terms: NL Overweg · FR Passage à niveau
Low emission zone (LEZ)
Official exam terms: NL Lage-emissiezone · FR Zone de basses émissions
Medically unfit to drive
Official exam terms: NL Medisch ongeschikt om te rijden · FR Médicalement inapte à conduire
Moped
Official exam terms: NL Bromfiets · FR Cyclomoteur
Motorway
Official exam terms: NL Autosnelweg · FR Autoroute
Motorway exit
Official exam terms: NL Afrit · FR Sortie
Non-public / private area
Official exam terms: NL Niet-openbaar gebied (privé) · FR Zone non publique (privée)
Number plate
Official exam terms: NL Nummerplaat · FR Plaque d'immatriculation
Overtake
Official exam terms: NL Inhalen · FR Dépasser
Parking
Official exam terms: NL Parkeren · FR Stationnement
Pavement / footpath
Official exam terms: NL Voetpad · FR Trottoir
Pedestrian
Official exam terms: NL Voetganger · FR Piéton
Pedestrian crossing
Official exam terms: NL Oversteekplaats · FR Passage pour piétons
Policeman / authorized person
Official exam terms: NL Bevoegd persoon · FR Personne habilitée
Priority road
Official exam terms: NL Voorrangsweg · FR Route prioritaire
Priority to the right
Official exam terms: NL Voorrang van rechts · FR Priorité de droite
Private road
Official exam terms: NL Privéweg · FR Voie privée
Public area
Official exam terms: NL Openbaar gebied · FR Zone publique
Public road
Official exam terms: NL Openbare weg · FR Voie publique
Registration certificate
Official exam terms: NL Inschrijvingsbewijs · FR Certificat d'immatriculation
Road marking
Official exam terms: NL Wegmarkering · FR Marquage routier
Roadworthiness inspection
Official exam terms: NL Technische keuring · FR Contrôle technique
Roundabout
Official exam terms: NL Rotonde · FR Rond-point
Seatbelt
Official exam terms: NL Veiligheidsgordel · FR Ceinture de sécurité
Speed limit
Official exam terms: NL Snelheidslimiet · FR Limitation de vitesse
Steering wheel
Official exam terms: NL Stuur · FR Volant
Stop (sign)
Official exam terms: NL Stop · FR Stop
Stop line
Official exam terms: NL Stopstreep · FR Ligne d'arrêt
Stopping
Official exam terms: NL Stilstaan · FR Arrêt
Temporary driving licence
Official exam terms: NL Voorlopig rijbewijs · FR Permis de conduire provisoire
Traffic light
Official exam terms: NL Verkeerslicht · FR Feu de circulation
Traffic offence
Official exam terms: NL Verkeersovertreding · FR Infraction routière
Traffic regulations / highway code
Official exam terms: NL Verkeersreglement · FR Code de la route
Traffic sign
Official exam terms: NL Verkeersbord · FR Panneau de signalisation
Tram
Official exam terms: NL Tram · FR Tram
Two-second following distance rule
Official exam terms: NL Tweeseconderegel (volgafstand) · FR Règle des deux secondes (distance de sécurité)
Tyre
Official exam terms: NL Band · FR Pneu
Verge (soft/hard shoulder)
Official exam terms: NL Berm · FR Accotement
Vulnerable road user
Official exam terms: NL Kwetsbare weggebruiker · FR Usager vulnérable de la route
Warning / danger sign
Official exam terms: NL Waarschuwingsbord · FR Panneau de danger
Zip merge
Official exam terms: NL Ritssluitingsprincipe · FR Principe de la fermeture éclair
Sign Reference
Warning
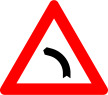
A1a — bend to the left
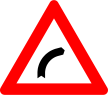
A1b — bend to the right
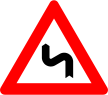
A1c — two or more bends, the first to the left
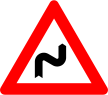
A1d — two or more bends, the first to the right
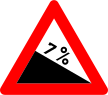
A3 — steep descent
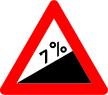
A5 — steep climb
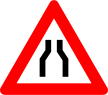
A7a — road narrows on both sides
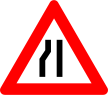
A7b — road narrows on the left
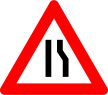
A7c — road narrows on the right
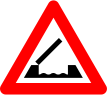
A9 — opening or swing bridge ahead
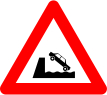
A11 — road ends at a quay or riverbank
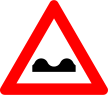
A13 — uneven road surface
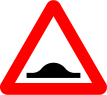
A14 — speed hump(s)
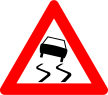
A15 — slippery road
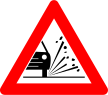
A17 — loose chippings
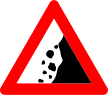
A19 — falling rocks
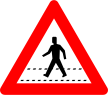
A21 — warning sign, placed about 150 metres before a pedestrian crossing
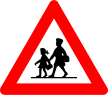
A23 — warning sign: children present
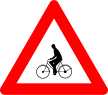
A25 — warning: a cyclist/moped crossing is about 150 m ahead
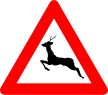
A27 — wild animals crossing
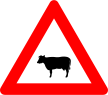
A29 — livestock crossing
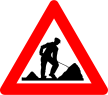
A31 — warning: roadworks ahead
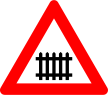
A41 — advance warning: crossing with barriers ahead
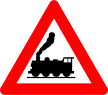
A43 — advance warning: crossing without barriers ahead

A45 — St. Andrew's cross at the crossing, single track

A47 — St. Andrew's cross at the crossing, two or more tracks
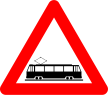
A49 — tram crossing ahead
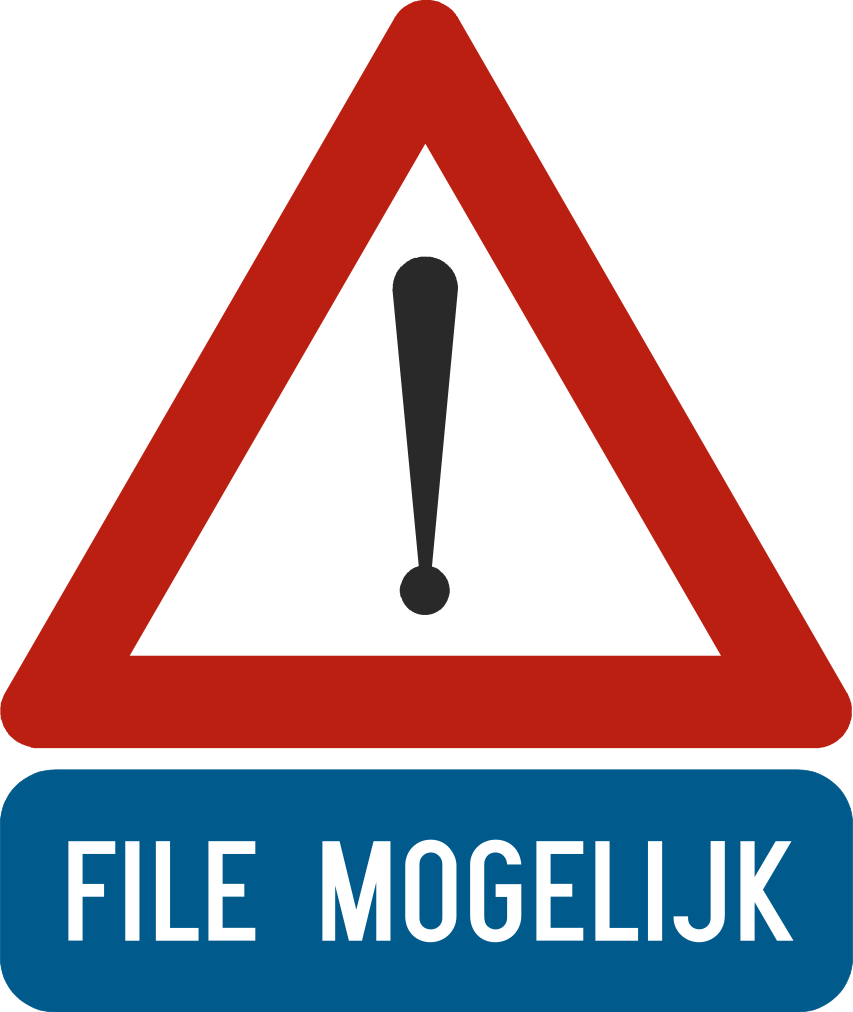
A51 — general danger, with a panel showing this hazard is a traffic jam ahead
Priority

B1 — give way
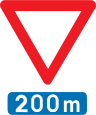
B3 — advance warning: give-way junction ahead

B5 — stop
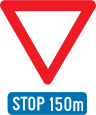
B7 — advance warning: stop sign ahead

B9 — priority road

B11 — end of priority road

B15 — priority at the next junction only

B17 — reminder: priority to the right applies at the next junction

B19 — give way to oncoming traffic

B21 — priority over oncoming traffic
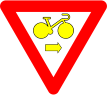
B22 — cyclists may turn right on red
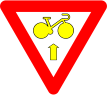
B23 — cyclists may go straight ahead on red
Prohibition

C1 — no entry, one-way restriction (oncoming traffic still allowed)

C3 — no entry for any vehicle, in both directions

C5 — no entry for motor vehicles with more than two wheels, and motorcycles with a sidecar

C6 — no entry for quad bikes (open-bodied, four-wheeled, off-road vehicles with a motorcycle-style handlebar and saddle)

C7 — no entry for motorcycles

C9 — no entry for mopeds

C11 — no entry for cyclists

C13 — no entry for animals in harness

C19 — no entry for pedestrians
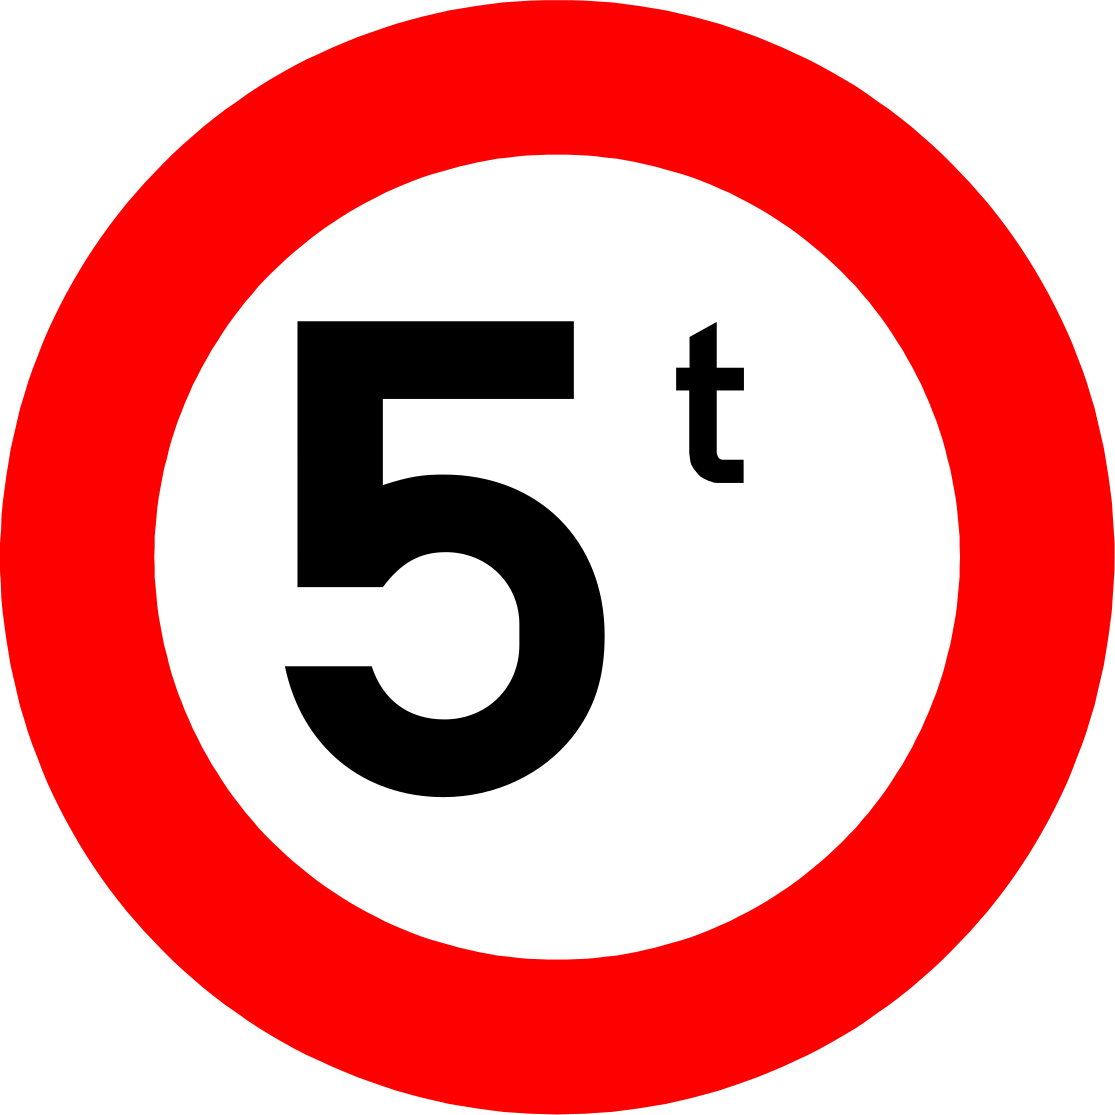
C21 — no entry for vehicles whose actual (gross) weight exceeds the value shown (here, 5 tonnes)

C22 — no entry for buses

C23 — no entry for goods vehicles

C24a — no entry for vehicles transporting dangerous goods

C24b — no entry for vehicles transporting dangerous flammable or explosive goods

C24c — no entry for vehicles transporting goods that could contaminate water

C25 — no entry for vehicles or combinations that, load included, exceed the length shown

C27 — no entry for vehicles that, load included, exceed the width shown

C29 — no entry for vehicles that, load included, exceed the height shown

C31a — no left turn at the next junction

C31b — no right turn at the next junction

C33 — no U-turn, from this sign up to and including the next junction

C35 — from this sign to the next junction, no overtaking of a motorcycle, an animal-drawn vehicle, or any vehicle with more than two wheels

C37 — end of the restriction imposed by C35

C39 — from this sign to the next junction, goods vehicles (or combinations) with an M.A.W. over 3.5 tonnes may not overtake a vehicle with more than two wheels, or one drawn by animals, on the left

C41 — end of the restriction imposed by C39

C43 — maximum speed 50 km/h (any number can appear on this sign)

C43 (90) with a panel below it — a speed limit that applies only to the exit ramp

C46 — end of all local restrictions imposed on moving vehicles (cancels C33, C35, C39, and C43 restrictions at once)
Mandatory

D1a — mandatory direction: straight ahead only

D1b — mandatory direction: left only (rotated 90° for the mirror-image right-only version)

D1d — obstacle ahead: pass it on the side shown by the arrow

D5 — mandatory roundabout direction

D7 — mandatory cycle track
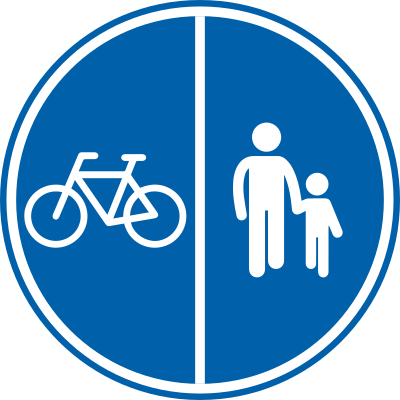
D9 — segregated path: pedestrians on one side, cyclists and moped class A on the other

D10 — shared path: pedestrians and cyclists together, mopeds not allowed
Parking & stopping

E1 — no parking

E3 — no stopping or parking

E5 — parking prohibited on this side from the 1st to the 15th of the month

E7 — parking prohibited on this side from the 16th to the end of the month

E9a — parking permitted

E9e — where you park, it must be on the verge or pavement only

E9f — where you park, it must be partly on the carriageway and partly on the verge

E9g — where you park, it must be on the carriageway only
Indication

F1a — start of a built-up area

F3a — end of a built-up area
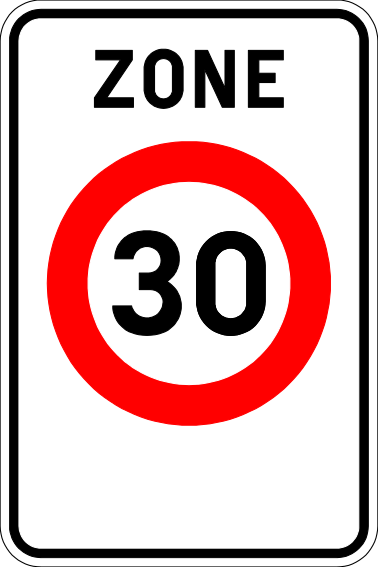
F4a — start of a zone 30

F5 — start of a motorway

F7 — end of a motorway

F8 — tunnel ahead of at least 500 metres long, often with a sub-plate showing the exact length or the tunnel's name

F9 — start of a road reserved for motor vehicles

F11 — end of a road reserved for motor vehicles
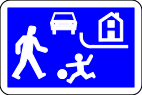
F12a — start of a residential area
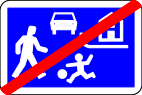
F12b — end of a residential area

F13 — advance sign showing which lane to take for each direction

F15 — motorway lane-destination sign: straight-down arrows show through lanes, angled arrows show a lane leaving at the next exit

F17 — bus lane
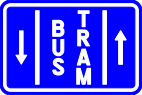
F18 — special track reserved for trams and buses

F19 — one-way traffic
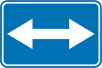
F21 — you may pass this obstacle or traffic island on either the left or the right

F23a — road number

F23c — number of an international (E-) road

F23d — number of a Belgian motorway (A-)

F45 — dead end (no through road)

F45b — dead end, except for pedestrians and cyclists

F49 — information sign, placed at the pedestrian crossing itself

F50 — placed at the crossing itself

F62 — emergency telephone, marks the SOS points spaced along a tunnel wall or motorway

F79 — advance sign: temporary lane closure ahead

F81 — advance sign: temporary lane diversion ahead

F83 — advance sign: temporary crossover onto the verge

F85 — advance sign: two-way traffic temporarily on a normally one-way road

F87 — speed hump indicator, marking the speed limit of 30 km/h
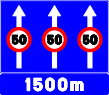
F89 — advance warning of the same limits, about 1500 m ahead
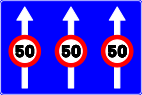
F91 — 90 km/h on the two left lanes, 70 km/h on the right lane

F97 — a lane ahead is closing

F99a — a path for pedestrians, cyclists, and riders together (the pictogram changes to match exactly which groups are allowed)

F99c — a concrete example of this pictogram: reserved for agricultural vehicles, pedestrians, cyclists, and riders

F101a — end of the road reserved for these categories
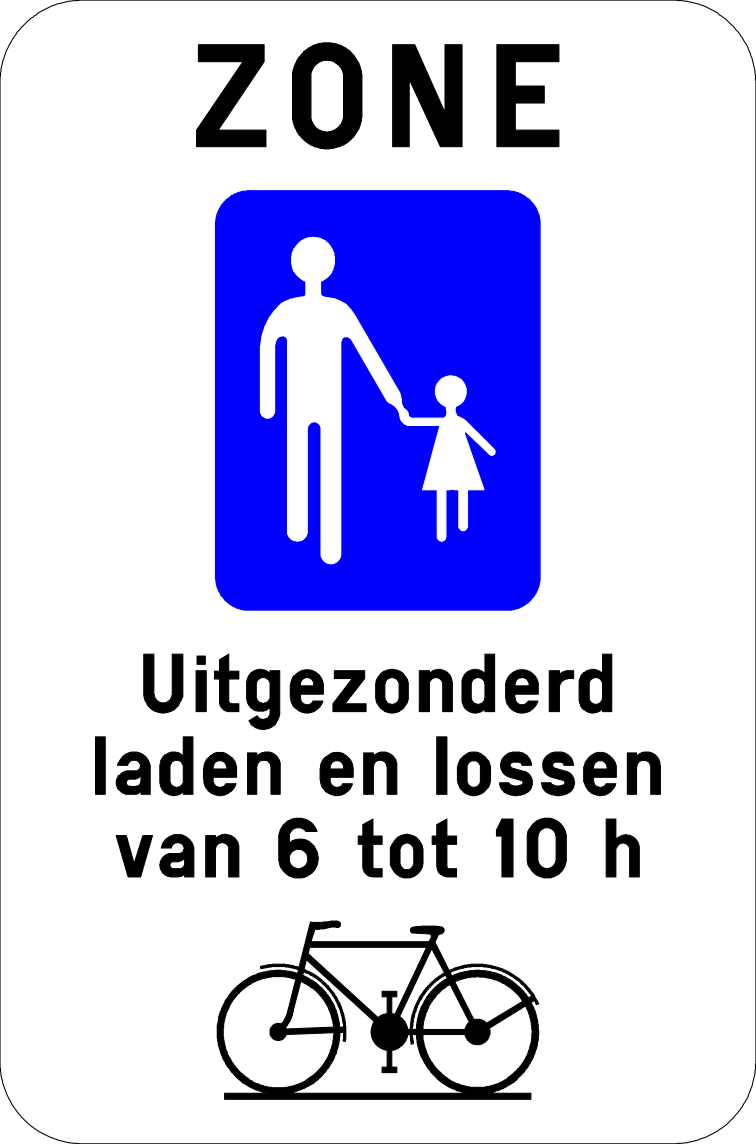
F103 — start of a pedestrian zone
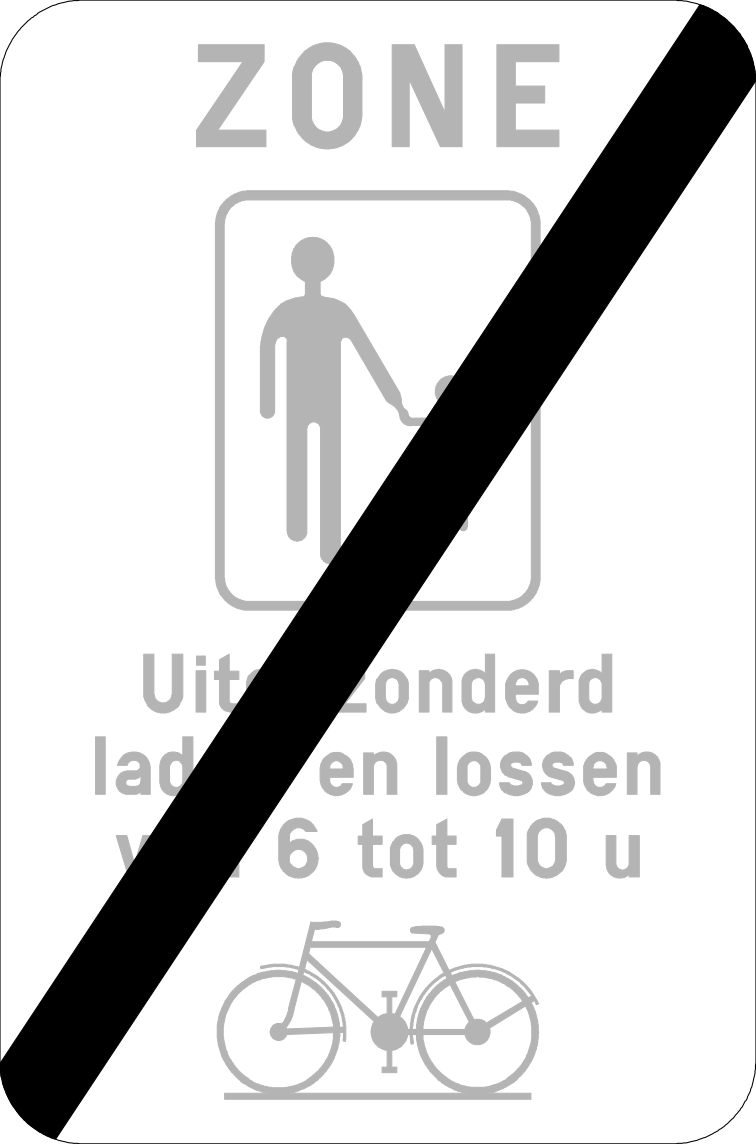
F105 — end of a pedestrian zone
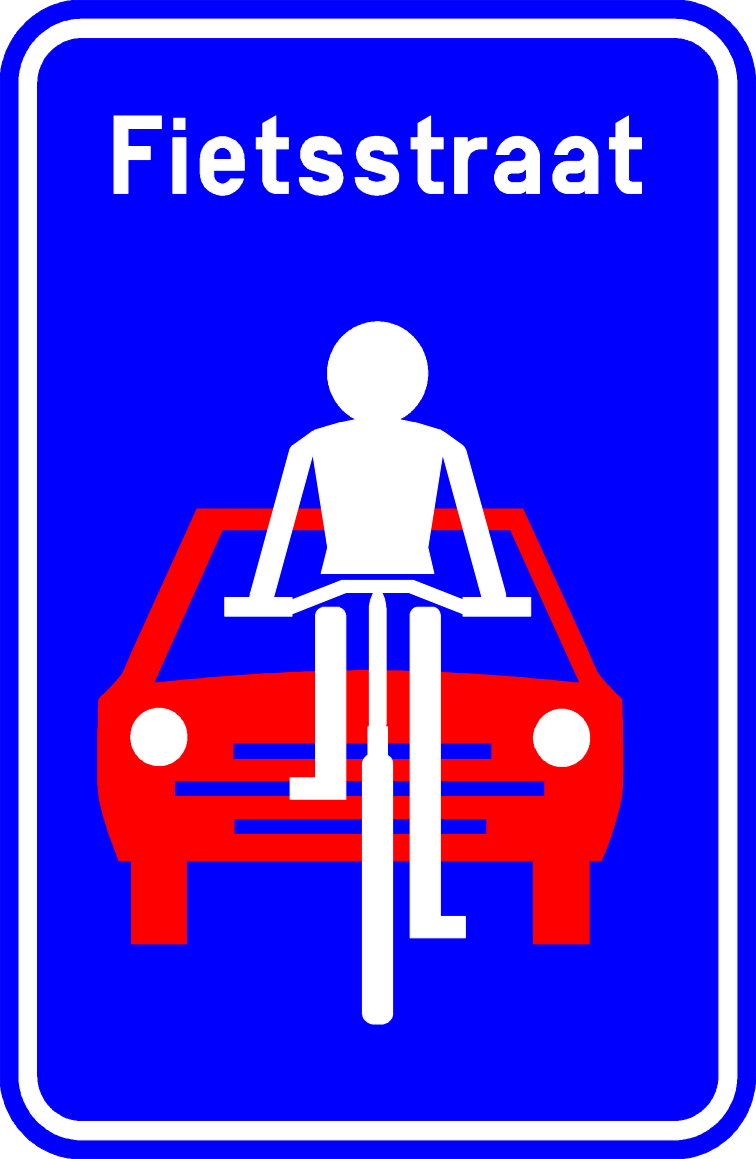
F111 — start of a bike street
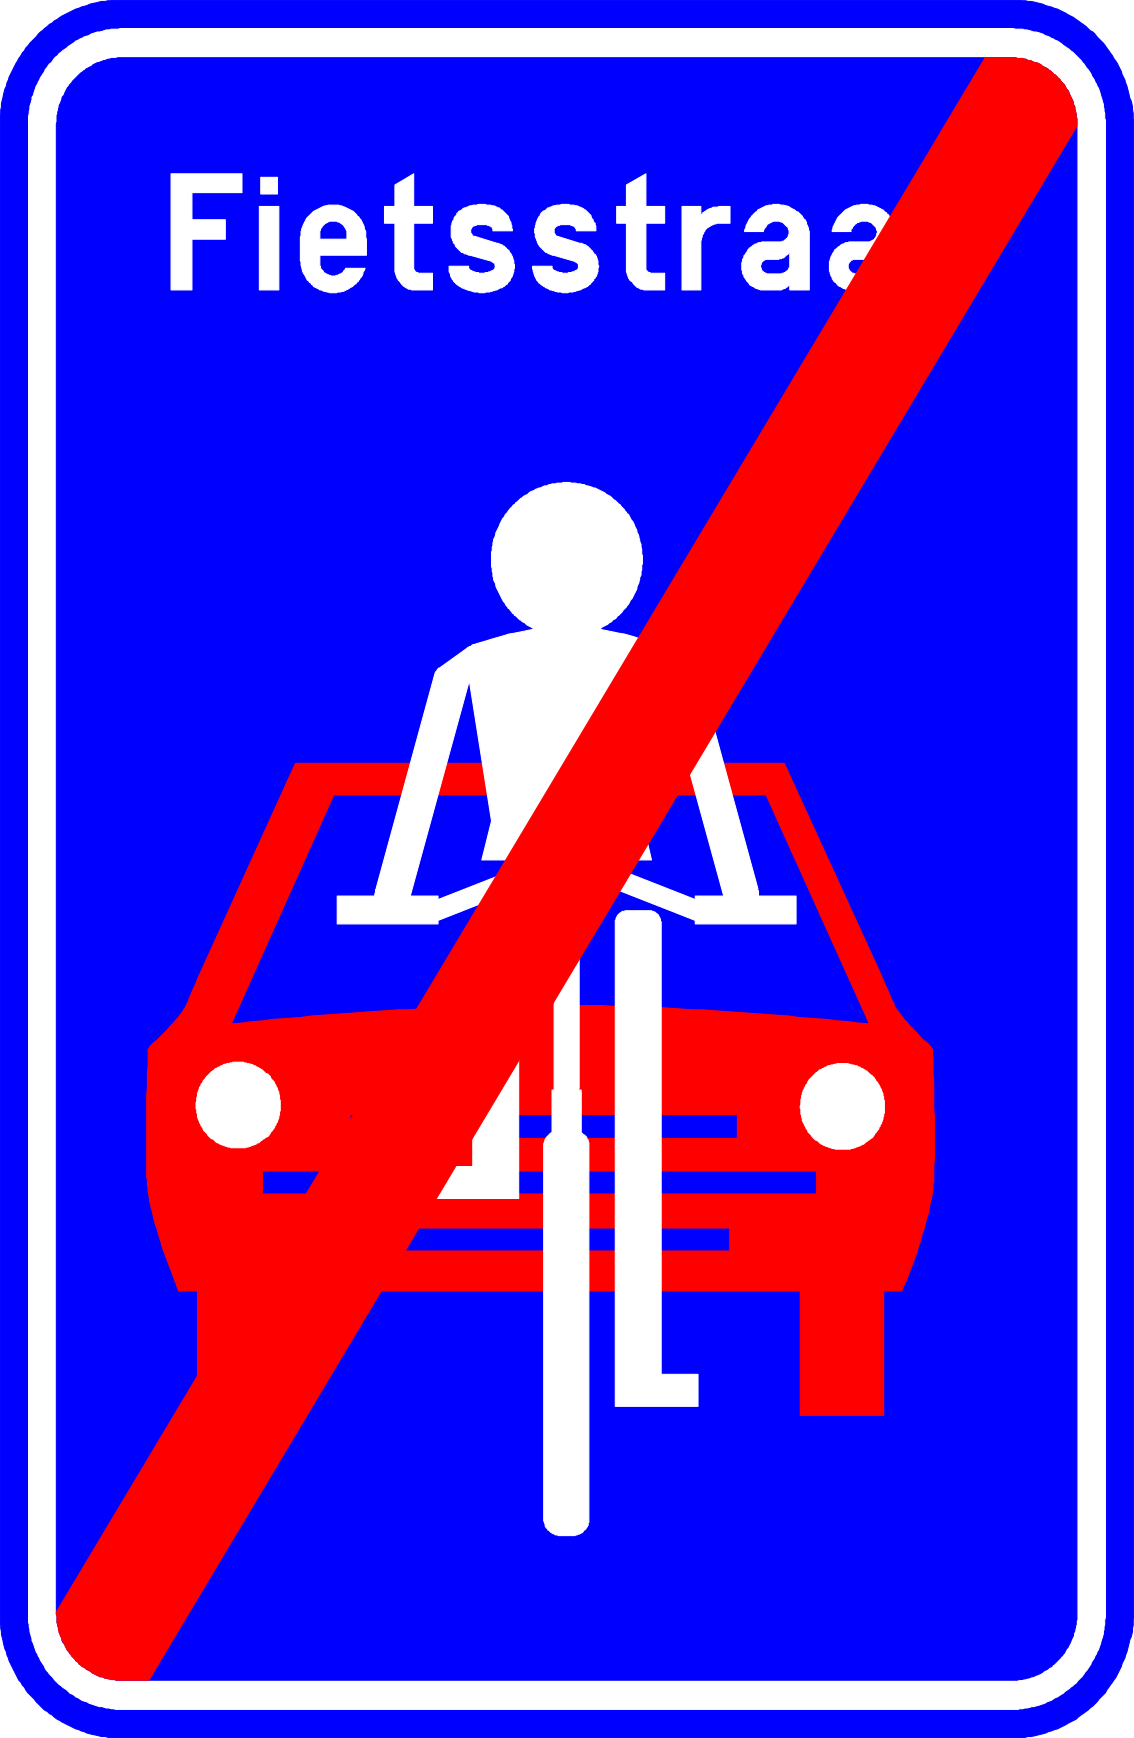
F113 — end of a bike street

F117 — start of a low emission zone (LEZ)

F118 — end of a low emission zone (LEZ)
Additional panels

GXI — the sub-panel used to mark that limit as applying to the exit only
Additional panels
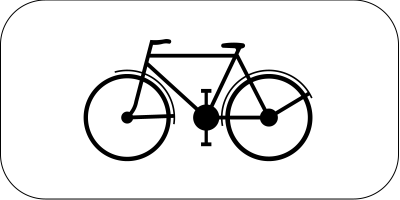
M1 — 'cyclists' (used under the F17 bus lane sign to admit cyclists too)
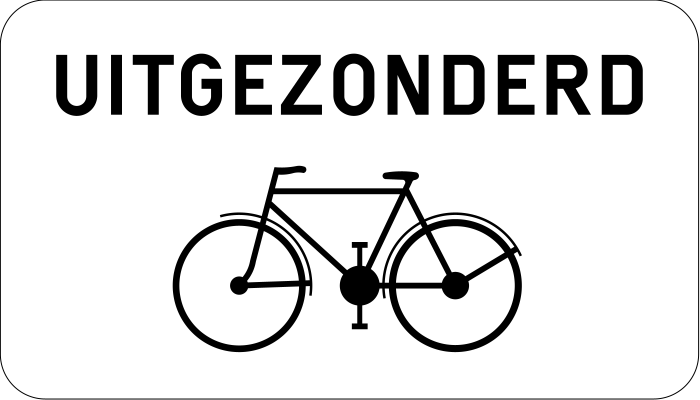
M2 — 'except cyclists' (used under a prohibition sign)
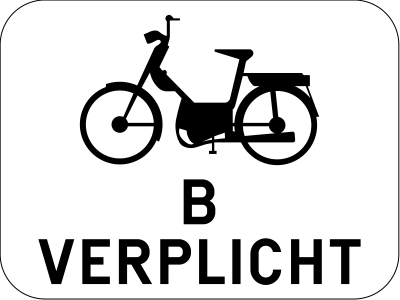
M6 — moped class B riders must also use this cycle track
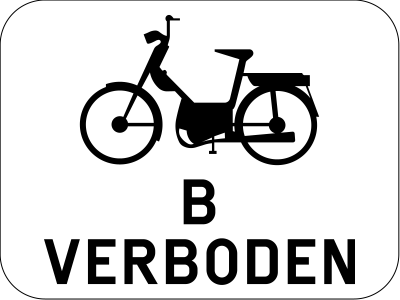
M7 — moped class B riders are not allowed on this cycle track
Additional panels
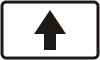
Xa — arrow up: the restriction above it starts here and continues beyond this point

Xb — arrow down: the restriction above it ends at this point